
Optimize your mobile app’s performance to safeguard its features, ensure a positive user experience, and boost SEO.
Continue readingOptimize your mobile app’s performance to safeguard its features, ensure a positive user experience, and boost SEO.
Continue reading
Boost your website’s loading time for high conversion rates and best SEO practices!
Continue reading
Mobile-responsive site: enhance user experience, boost traffic, conversions, and search engine ranking.
Continue reading
Web Design and Development Guide Table of Contents Web Design and Development
Continue reading
In today’s fast-moving world, businesses are also rethinking their ways of hiring the right talents to scale their businesses. However, an IBM report states that 45% of organizations still struggle to find the right expertise according to their requirements.
To bridge this gap between the employer and the expertise-level talent, resource and staff augmentation service providers have become part of the hiring process.
In this article, we’ll cover how to use resource augmentation to speed up the hiring process and boost your team’s overall productivity.
Resource and staff augmentation refers to the practice of supplementing a company’s existing workforce or resources with external talent or additional resources on a temporary basis.
It involves hiring individuals or outsourcing specific tasks or projects to external experts or agencies to meet short-term goals or address skill gaps within the organization.
In resource augmentation, you can seek external resources, including equipment, software, infrastructure, and staff, to support your business operations.
Resource and staff augmentation is one of the most flexible and fastest ways to hire a specialist for a limited time. It is a perfect alternative to hiring a full-time expert resource for startups and mid-tier companies for specific projects and limited time periods.
This augmented staffing model helps you:
For example, if you run a web development company but got an opportunity to develop an app, you can hire a programmer to make an app through resource augmentation.
This will help you reduce costs while benefiting from the experiences and skills of a mobile app development expert.
Before we walk you through the process of resource augmentation, let’s look at the key benefits of this strategy.
Finding the right talent for your expanding organization can be exhausting, especially when you need app developers to boost your development team.
But fear not!
Resource augmentation offers a perfect solution, providing you with the flexibility to hire temporary individuals or teams for project-specific needs. This lets you test new projects based on market viability without long-term commitments.
Traditional full-time hiring is both time-consuming and costly. That’s where staff augmentation services come to your rescue!
They enable you to save precious time, money, and resources that you can invest elsewhere in your organization. With the timeshare model, you can tap into fractional payments for usually expensive resources (like hiring a web developer), maximizing cost and time efficiency.
Resource and staff augmentation providers boast of helping you employ the top 1% of talent.
Just imagine collaborating with stellar software engineers, UX designers, web and app developers, and Agile experts!
By bringing in specialized professionals for specific projects, you can unlock focused efforts dedicated to achieving your business goals. This level of productivity is often challenging to attain with an in-house team, who have multiple organizational responsibilities.
Staff augmentation empowers you to skyrocket your productivity when you need it most.

In a nutshell, staff resource augmentation empowers your organization to seamlessly adapt, optimize costs, and tap into exceptional talent.
So, why settle for the ordinary when you can supercharge your capabilities and achieve extraordinary results?
Staff augmentation is a powerful strategy for augmenting your workforce with external talent that fits your specific project needs.
Let’s explore the different types of staff augmentation and learn when to choose which one.
| Commodity Staff Augmentation | Skill-Based Staff Augmentation | Highly-Skilled Staff Augmentation |
|
This type of staff augmentation focuses on fulfilling general or common roles within your company. These roles may include administrative support, data entry professionals, customer service representatives, or entry-level positions. It is ideal for menial tasks and ensuring smooth operations while allowing your core team to focus on higher-value activities. |
It involves hiring individuals with specialized skills and expertise that your in-house team lacks. These roles may require in-demand skills, critical for the success of specialized projects. For example, experienced web developers, app developers, graphic designers, or marketing specialists. It is ideal for fulfilling short-term requirements by tapping into the right talent pool. |
This staffing model focuses on hiring top-tier professionals with extensive experience and advanced expertise. These roles may include hiring senior-level executives, subject matter experts, or consultants to drive critical projects, provide strategic guidance, or bridge skill gaps. It is ideal for bringing in industry-leading talent to tackle complex challenges and strategic initiatives to enhance the quality and efficiency of your project workflow. |
Selecting the ideal staff and resource augmentation partner may seem like a daunting task. However, fear not!
Before diving into the process of shortlisting potential augmentation partners, here’s a helpful checklist to ensure you make the right choice for your organization:
Begin by clearly defining your project requirements and objectives.
This evaluation will serve as your compass throughout the augmented staff selection process.
Look for augmentation partners who have a proven track record in the specific areas you require. Consider their industry experience, client testimonials, and success stories.
A partner with relevant expertise will bring invaluable insights to the table and help enhance the quality of your projects.
Also, ensure that they are a good cultural fit for your company because smooth collaboration is key to any project’s success. Seek partners who align with your brand’s values, work ethic, and communication style.
Clear and open communication is vital when working with an augmentation partner.
To establish a solid foundation for resource and staff augmentation, it’s crucial that you:
Dependability is crucial in an augmentation partner.
You should assess their reliability in meeting project deadlines, delivering on promises, and maintaining confidentiality. For this, you can review their past projects and ask for testimonials from clients they’ve worked with.
How much does it cost to hire an app developer with six years of experience?
While the cost of hiring an app developer is a deciding factor in staff augmentation, you should also consider the value they bring to the table.
Remember, it’s not just about finding the cheapest option but the one that offers the best return on your investment.
Did you know that about 86% of staff attributes business failures to a lack of effective collaboration and communication?
To make resource augmentation work in your favor, you need to employ the right talents and establish strong work relationships with them.
Your goal should be to bridge the gap between your outsourced and in-house teams and leverage the most of their capabilities to meet your project goals. Here’s how to do this:
When using staff augmentation services, it’s crucial to have a robust performance assessment system in place. This will help ensure that your augmented staff members meet your company’s standards and expectations.
This process involves:
This ongoing assessment will not only keep everyone accountable but also help you achieve your goals faster.
Resource augmentation offers numerous advantages, but it also comes with its fair share of challenges.
Let’s take a look at some of the common challenges that you’ll face while implementing staff and resource augmentation. We’ve also shared the most effective solutions to address each of these challenges.
Challenges |
Solutions |
|
Ineffective communication and coordination |
Fostering open communication Utilizing collaboration tools like Slack and Zoom |
|
Cultural misalignment |
Promoting cultural understanding |
|
Failed expectations or quality control issues |
Defining clear goals and responsibilities Implementing performance evaluation processes Investing in training |
|
Project management and monitoring issues |
Setting up a project management process Leveraging powerful project management tools like ClickUp |
|
Difference in time zones |
Setting a working schedule that bridges the gap |
Here we conclude our comprehensive guide on resource augmentation. By now, you should have understood:
In all, employee augmentation is an effective solution to hiring experienced professionals (like web developers) for increasing your productivity without the pressure of hiring a new in-house person.
By partnering with a resource augmentation service provider, you can find the right talent pool for a limited time and use their expertise to walk towards achieving your bigger business goals.
Resource augmentation refers to the practice of supplementing your existing team with external resources, such as skilled professionals.
It can help boost your team’s productivity by providing access to additional expertise, skills, and resources when needed. By augmenting staff, you can scale up or down quickly, tap into niche talents, and complete projects more efficiently.
This will, ultimately, help accelerate your team’s output and overall productivity.
To determine the right augmented resources for your team, keep these things in mind:
When choosing a resource augmentation partner, consider these factors:
To measure the impact of resource augmentation on the overall business performance, set specific key performance metrics (KPIs) and timelines. This will help you evaluate the performance of your augmented staff.
Be sure to assess their performance regularly to ensure that they are meeting your company’s standards.

The growth of the mobile app development market has been steady for the past few years.
According to the Statista report, the estimated worldwide revenue from mobile applications will be $935.2 billion in 2023. This unprecedented growth is predicted to witness a shift in demand for custom mobile app development among SMEs and startups.
There are more than 5.7 million apps on Google Play Store and App Store combined. Launching a new app in this clustered app market is not a seamless task. Despite the cut-throat competition, app marketers should take advantage of the opportunity to invest in a mobile app.
If you want to enter the app market but are unaware of the process, this post covers everything you need to get started. It includes information about the different phases of app development and how to promote your app to the right people.
Dive in, and start the journey to develop mobile apps for your business.
Mobile app development refers to the process of creating software applications for smartphones, tablets, and other Android and iOS devices.
This involves designing, coding, and testing the app to ensure that it functions properly and provides a good user experience.
You can develop a mobile app using various programming languages and tools, such as Java, Swift, and HTML5. But it is a complex process and requires expertise in different areas like UI/UX design, programming, and testing.
That’s why most companies either hire professional mobile app developers or outsource their app development to specialized firms.
In today’s rapidly growing digital ecosystem, there is an app to serve every purpose.
According to the State of Mobile report, the year-on-year growth of the mobile landscape has touched +27%, and in 2020 brands spent close to $143B in the app store.
This number is growing rapidly. If you still don’t spend on app development and marketing, you’ll be losing opportunities.
Some of the advantages of mobile app development include:
20 years ago, the question looming in the minds of businesses was – “Why should we develop a website or software solution?”
Today, this question doesn’t stand a chance as having an app or a website is not a choice but a need.
A Statista report highlights that in 2021, around 230 billion mobile apps were downloaded and 2 million new apps were released.

Source: Statista
The demand for mobile apps has grown because of the rapidly changing consumer behavior patterns, business models, and processes across industries in the past decade.
Today, we have an app for every basic activity in life including opening a smart lock, ordering food, and medicines, watching television, and many more.
The penetration of the internet and the accessibility to smartphones have also changed the face of the app market worldwide.
According to another study, the smartphone user base growth has increased by 10.4% from 2016 to 2022. And it is expected to reach 7.7 billion by 2027.
Based on this observation, the rate of growth in the mobile app development market is expected to see rapid growth instead of a slowdown in the next 10 years.

Source: Statista
In today’s ever-evolving digital world, having a mobile presence is not enough. To survive in the dynamic environment, marketers need to keep updating the technology of the app and stay relevant.
Here are a few mobile app development trends that are making a buzz in the industry:
The mobile app development process typically involves several phases. These phases can vary depending on the specific approach you take as its development team, but some common phases include:
This phase involves formulating a strategy for app development, analyzing the concept of your app, and shaping it into a real product.
1) Identify the main objectives of your app
This is the first and crucial step of the mobile app development process. In this stage, you need to define the “why” behind your mobile app development initiative
You should ask yourself:
Answering these questions will help you get a clear vision behind your app idea and help you analyze its potential.
2) Decide on the type of app you want to build
You need to make some high-level strategic decisions on the technology to use and the type of app to build for your business.
Two common options include:
⦁ Native apps that are designed specifically for a particular operating system, such as Android or iOS devices. This allows them to take advantage of the device’s processor and other hardware features like the camera and microphone.
⦁ Hybrid apps that are built to be compatible with both Android and iOS devices. But this type of app cannot access the device’s processor, so they rely on an internet browser.
While hybrid apps offer cross-platform compatibility, they may not perform as well as native apps that can directly access the hardware of the device.
To help you choose between native and hybrid apps, we’ve put together their pros and cons:
3) Choose a platform for your app development
When it comes to app development, it’s essential to avoid the temptation to build your app for all possible platforms. This is one of the biggest mistakes app developers make.
Focusing on adding too many features or platforms can be counterproductive to your vision and will increase the initial costs of app development.
Instead, it’s best to:
4) Create a wireframe to guide your mobile app development process
Starting without a direction can cost you money and resources. So, you should carefully plan the skeletal framework of your mobile app.
This includes:
5) Decide between in-house vs. outsourced mobile app development
When it comes to developing mobile apps, there are two main options:
The best option for your company will depend on various factors.
If your organization already has experienced mobile app developers with the appropriate tech stack and capacity, then developing your app in-house might be a good option.
However, developing a mobile app in-house has its challenges:
Opt for this option only if you have a stable and efficient team of developers and managers, and the budget and cash flow to keep going.
Outsourcing the project to a mobile app development company may be a better option. Especially, if the app is just one part of your business and not the core revenue driver.
Why so?
Here are some benefits of outsourcing mobile app development:
6) Choose a mobile app development company to outsource your project
If you determine that outsourcing the development of your mobile app to a specialized partner is the best option for your business, focus on selecting the right partner.
You should evaluate the potential app development partner by considering these factors:
Review the company’s case study, portfolio, and experience in mobile app development, specifically for iOS, Android, and web apps.
Confirm that the development team is comfortable using the app development frameworks and programming languages that you’ve selected.
Request information about the mobile app prototyping tools they use and how they can aid in the development process.
Ensure that they are knowledgeable about the existing coding standards.
Ask about their app development and release process.
Verify their expertise in API integrations.
Request information on the data security features they will implement during the development process.
Inquire about their PCI-DSS certification and how they will comply with all certification requirements when designing payment gateways.
Ask about their app testing process and the tools they will use for testing.
You should also consider your budget and the domain of your app while finding app development companies that can meet your needs and suit your budget.

Malicious cras turpis sed orci tempor, eget portattitor nisl volutpat. Fusce hendrerit facileisis erat.
Continue reading
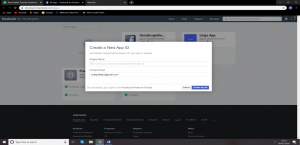
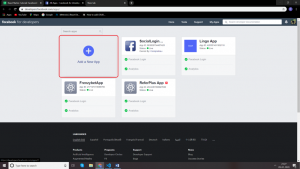 Click on the “+” Add a New App Icon and enter the Display name and make sure to enter a valid name as per the Facebook developer rule. After that click on the ‘Create App ID’.
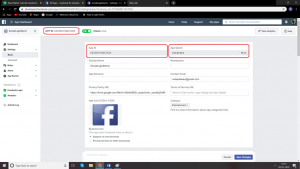
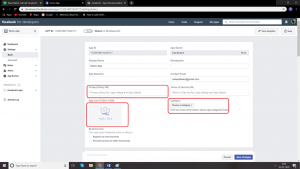
 Click on the setting menu from the navigation sidebar on the left side. In that click on the basic menu option. On the next step to write down the App ID and App Secret on the notepad.
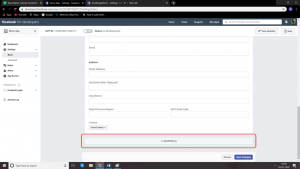
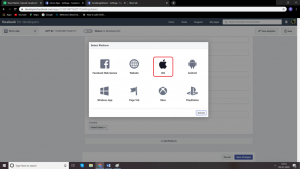
 Scroll down the page and click on the Add Platform button.
 First, click on the ios icon from the list and enter into the setup.
 In that click and enter the bundle ID host.exp.Exponent and click on the save changes button.
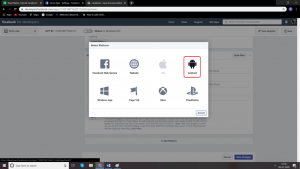
 Click on add platform button and add the Android platform from the list.
 Add key hash into the key hashes rRW++LUjmZZ+58EbN5DVhGAnkX4= and click on the save changes button.
 After all the process finish the remaining information like privacy policy URL, App Icon (1024 x 1024) and choose the category.
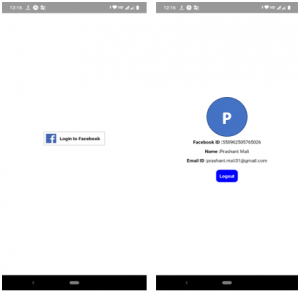
 For react native Facebook login. You can access the code from the official link: https://docs.expo.io/versions/latest/sdk/facebook/
Facebook Login App Screens :
For react native Facebook login. You can access the code from the official link: https://docs.expo.io/versions/latest/sdk/facebook/
Facebook Login App Screens :
 For more information react-native source code link is below:

This article introduces the React Multiple Select using React Hooks.
I have vendors in various cities who are providing service to their customers. The situation is I need to assign societies to vendors as per their preference. A vendor may provide service to multiple societies in an area.
For this, I used Metronic theme and React hooks – useEffect.
There is a list of vendors and now I want to assign societies to a particular vendor.
To do so I redirected to details of the vendor.
First, select a city, then an area and then I want a filtered list of societies from that area of the city.
![]()
Step 1 :
Fetched a list of cities using async-await with useEffect hook.
/* Get list of all Cities */
const apiUrl = API_ENDPOINT + “city_list/”;
useEffect(() => {
const fetchData = async () => {
const result = await axios(apiUrl).then(response => response.data)
.then((data) => {
setData(data.data);
let count = Object.keys(data.data).length;
setcount(count);
})
};
fetchData();
}, []);
/* End Get list of all Cities */
Step 2 :
Fetched a list of areas from the selected city using async-await with useEffect as —>
/* Get area list by City */
const apiUrlArea = API_ENDPOINT + “area_list/”;
useEffect(() => {
let postAreaData=”;
if(formdata.city_id && formdata.city_id !==”){
postAreaData = {city_id:formdata.city_id}
const fetchData = async () => {
const result = await axios.post(apiUrlArea,postAreaData).then(response => response.data)
.then((data) => {
setareadata(data.data);
})
};
fetchData();
}
},[formdata.city_id]);
/* End Get area list by City */
Here formdata contains details of the vendor to edit.
This code will get executed as we change City and we are able to get a list of all areas from the selected city.
Step 3 :
Now I have a city and area , I can get a list of all societies in that area.
/* Get Societies by City & Area */
const apiUrlGetSociety = API_ENDPOINT + “society_list”;
useEffect(() => {
let postCityAreaData = {
area_id:formdata.area_id,
city_id:formdata.city_id,
}
const temp_slist = [];
if(formdata.area_id && formdata.area_id!== ” && formdata.city_id && formdata.city_id!== ” ){
const fetchData = async () => {
const result = await axios.post(apiUrlGetSociety,postCityAreaData).then(response => response.data)
.then((data) => {
data.data.forEach(element => {
const obj_temp = {‘id’:element.id, ‘name’:element.name};
temp_slist.push(obj_temp);
});
setAllSocieties(temp_slist);
setShowLoading(false);
console.log(“allSocieties”);
console.log(temp_slist);
})
};
fetchData();
}
},[formdata.area_id,formdata.city_id]);
/* End Get Societies of Area */
Here I get a list of societies as an array of object – {id,name}
let allSocieties = [ {“id”: 6,”name”: “Abhiruchi”}, {“id”: 2,”name”: “Sahara Society”}, {“id”: 3,”name”: “Satyam Society”},]
Now we have a filtered list of societies with respect to the area from the city.
Step 4 :
To show listing on form I used form-components from Metronics.
( https://keenthemes.com/metronic/preview/react/demo2/google-material/inputs/selects )
The Select component can handle multiple selections. It’s enabled with multiple property.
<FormControl className='form-control'>
<Select
multiple
name = “societies”
id = “societies”
value = { selectedSocieties }
onChange = { handleChange_multiple }
input = { <Input id=”select-multiple-chip” /> }
renderValue = { selected => (
<div className = {classes.chips}>
{ selected.map( s => {
const chipname = allSocieties.find(soc => soc.id === s);
return (chipname
? <Chip
key={s}
label={chipname.name}
className={classes.chip}
data-aaa={JSON.stringify(allSocieties)}
/>
: ”)
})}
</div>
)}
MenuProps={MenuProps}
>
{ allSocieties.map((itemsociety) => (
<MenuItem
key={itemsociety.id}
value={itemsociety}
>
<Checkbox checked={selectedSocieties.includes(itemsociety.id) } />
<ListItemText primary={itemsociety.name} />
</MenuItem>
))}
</Select>
</FormControl>
In the above select component, we have passed selectedSocieties to value attribute.
selectedSocieties is an array of ids of societies which are already assigned to vendor.
I can get list of assigned societies to vendor as –>
useEffect(() => {
setShowLoading(true)
setformdata(props.data)
if(props.data.vendorSociety && props.data.vendorSociety !== ” && props.data.vendorSociety !== ‘undefined’ ){
props.data.vendorSociety.forEach(el => {
const obj = {‘id’:el.id, ‘name’:el.name};
temp_selected_slist.push(el.id);
})
setSelectedSocieties(temp_selected_slist);
}
}, [props.data]);

After selecting one/more societies, handleChange_multiple event bind selected societies data to selectedSocieties . See the following code:
const handleChange_multiple = event =>{
let newitems = event.target.value.filter(t => typeof t !== ‘number’);
let changed = newitems[0].id;
let cleanthis = event.target.value.filter(t => typeof t === ‘number’);
newitems.forEach(i => cleanthis.push(i.id));
const newSelectedItems = selectedSocieties.includes(changed)
? selectedSocieties.filter(v => v !== changed)
: […selectedSocieties, changed];
setSelectedSocieties(newSelectedItems);
}
In the example given in Metronic , handleChange event deals with an array of the name only. In above we are dealing with an array of objects.
In the above code, in handleChange_multiple event, we get newly selected items as an object – newitems {id,name}. Then extract id from it and saved to changed.
Now I can check with changed whether it exist in selectedSocieties.
const newSelectedItems = selectedSocieties.includes(changed)
? selectedSocieties.filter(v => v !== changed)
: […selectedSocieties, changed];
setSelectedSocieties(newSelectedItems);
In above article , we learned how to use multiple select in combination with array of objects and obtain required results.

 Step 3: Go to newly created ReactWorkspace directory location using command – see screenshot:
cd ReactWorkspace
Step 3: Go to newly created ReactWorkspace directory location using command – see screenshot:
cd ReactWorkspace
 Step 4: Setting up React Boilerplate.
We will install the boilerplate globally.
npm install –g create-react-app
Create a React Boilerplate using the above command – see screenshot.
Step 4: Setting up React Boilerplate.
We will install the boilerplate globally.
npm install –g create-react-app
Create a React Boilerplate using the above command – see screenshot.
 -g represents the global installation type.
Step 5: After successfully installing a global react environment. Create react demo app using the following command:
create-react-app demoapp
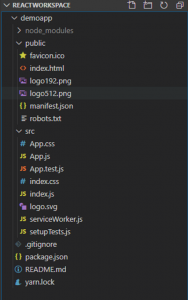
The above statement will create a new directory named demoapp inside your current directory with a bunch of files needed to successfully run a React app.
Let’s have the look at the directory created by the above command:
-g represents the global installation type.
Step 5: After successfully installing a global react environment. Create react demo app using the following command:
create-react-app demoapp
The above statement will create a new directory named demoapp inside your current directory with a bunch of files needed to successfully run a React app.
Let’s have the look at the directory created by the above command:
 In the following directory, you will see a number of files. The main files we will be working on within the basic course are index.html and index.js. The index.html file will have a div element with id = “root”, inside which everything will be rendered and all of our React code will be inside the index.js file.
 Now, that we have successfully set up the development environment for React Js.
The last thing is to start the development server.
Step 6: To start the development server, go inside your current directory “demoapp” and execute the below command:
npm start
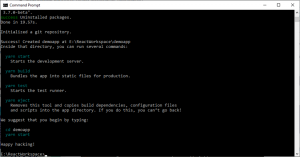
After successfully running the above command your compiler will show the below message on your screen:
Now, that we have successfully set up the development environment for React Js.
The last thing is to start the development server.
Step 6: To start the development server, go inside your current directory “demoapp” and execute the below command:
npm start
After successfully running the above command your compiler will show the below message on your screen:
 And after starting our first React application, we will see the default screen on the browser.
 Component creation in React Js:
Components are the reusable peace of code for building blocks of any React application. It’s like JavaScript functions. They accept arbitrary inputs (called “props”) and return React elements describing what should display on the screen.
We have seen the default structure of the ReactJS application in step 5 second screenshot.
Create a new component file in /src folder-
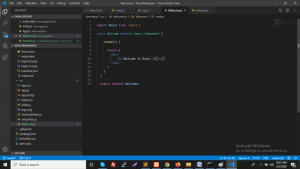
I have created Welcome.js and add component code in that file-
Component creation in React Js:
Components are the reusable peace of code for building blocks of any React application. It’s like JavaScript functions. They accept arbitrary inputs (called “props”) and return React elements describing what should display on the screen.
We have seen the default structure of the ReactJS application in step 5 second screenshot.
Create a new component file in /src folder-
I have created Welcome.js and add component code in that file-
import React from 'react';
class Welcome extends React.Component {
render() {
return (

Welcome to React Js

)
}
}
export default Welcome;
see the following screenshot:
 And we need to add our newly created Welcome.js file into index.js to see it on the browser screen:
 Now we can see the output on browser screen:
 In the above article, we learned how to setup React JS Environment and create simple components.